A Silhouette cutter is a great little piece of equipment to cut vinyl to create your own custom shirts.
If you are only making a couple of any particular design, it’s pretty fast and easy.
The problem arises, however, if someone comes to you and wants more than just a couple. Say they loved the design you created (in Silhouette) and now they want a bunch more – like 20 or more, for their next family reunion or vacation.
The more designs you create and the more shirts you make, this could easily start happening more and more.
When it does happen, what is your plan? How will you go about creating large quantities of custom apparel?
Your Silhouette cutter is great for low quantities, but for larger quantities, multi-color designs, or intricate artwork, you will probably want to switch to screen printed or digital transfers.
[Related Content: 4 Reasons When You Should Switch from Vinyl (HTV) to Screen Printed Transfers]
What are Heat Applied Transfers?
Screen printed and digital heat applied transfers are the fastest and easiest way to decorate custom apparel.
All you need is a heat press to apply the heat applied transfers to your blank apparel.
It is a similar process to the shirts you are already creating with your Silhouette cutter, except you don’t have to cut out the designs from vinyl.
Instead, we print the transfers for you from your design. Our screen printed transfers are actually screen printed inks, just like direct screen printing.
Instead of printing directly onto the apparel, it is printed onto a special transfer paper and all you need to do is apply them with your heat press.
[Related Content: Why You Need to Spend More Than $300 for a Heat Press]
Once the transfers arrive, our Goof Proof screen printed transfers apply in just 4 seconds and your end result is a screen printed shirt.
This video summarizes the process quickly.
Super fast and easy.
So what is the process?
You simply have to upload your design to us through our upload portal or through Easy View, our online transfer designer. All you need to do is set up a free account.
So how do you get your design that you created in Silhouette into Easy View?
That’s also easy.
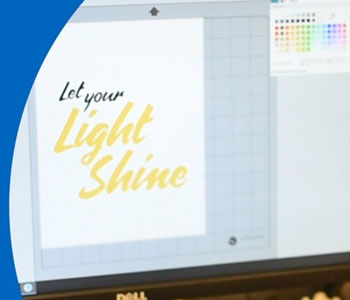
Your T-Shirt Artwork in Silhouette
There are actually 2 ways you can use your artwork that you created in Silhouette.
Method 1: “Print” to PDF
For this method, you will need an application that can “print to PDF”. Basically, you will be saving your design as a PDF file.
Microsoft Print to PDF is a virtual printer already installed on Windows 10 computers. There’s also another program called PDF Creator that can be downloaded for free.
When you have your design open in Silhouette, first you’ll click on the print icon.
Next, select a “virtual printer”, whichever you would like to use (ex: Microsoft Print to PDF). Click the print button.

Choose the location where you would like to save the file and click Save.
Give your file a name.
Next, go into the Easy View designer at TransferExpress.com.
You will need to log in to your account, so if you haven’t created an account yet, you will need to do that first. It only takes a few minutes to fill out the registration and you will have immediate access.
Once you are in Easy View, click the “Add your art” button.
[Related Content: How to Upload Artwork for Custom Heat Applied Transfers]
Open the PDF file that you saved from Silhouette.
It may take a few seconds to import.

You’ll notice that the file imports in slices. This is the downside of the Print to PDF method.
Delete any extra boxes, being careful not to delete any parts of your design.
Click on the “object” drop down, and group your slices together.
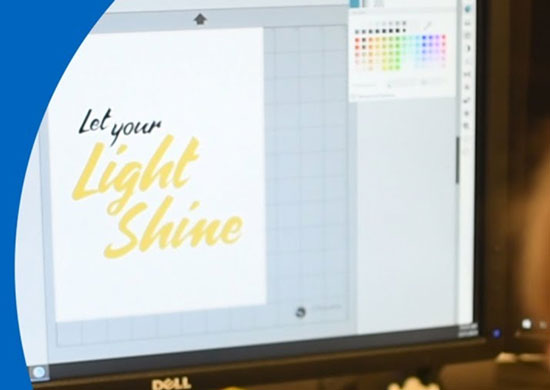
Method 2: Taking a Screen Capture
For the second way to get your art into Easy View, you will be taking a screen capture.
First, start with your design open in Silhouette. Make sure your design takes up as much of the screen as possible.
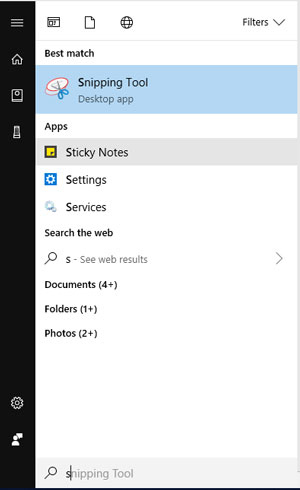
Then, open the Snipping Tool or other program that you use for screen shots. You can find the Snipping Tool on your Windows computer by clicking on the Windows icon and start typing the word snip to bring up the tool in the search results.
Click “New”, and use the crosshairs to click and drag a selection around your design.
Get as close as you can to your design so there is not extra space around the edges of the design.
The Snipping Tool will show you a preview of your screen capture. From there, you can save your design as a .jpg or a .png file.
Next, log into Easy View and import the file you just saved by clicking on the “Add your art” button.

Since this is a raster image, you will need to use the “Configure Color Map” button on the left side of the screen to choose your ink colors if you are going to use screen printed transfers.
[Related Content: The Complete Guide to Image File Types]
On the other hand, if you are going to get digital transfers, you can choose that in the print method drop down menu in the upper right hand side of Easy View.
Conclusion
And that’s it!
You can use either method to upload your Silhouette art into Easy View for screen printed transfers or digital heat applied transfers.
So next time someone comes to you wanting more than just a couple of shirts, you can use your same Silhouette t-shirt design to print many shirts quickly and easily with no headaches or worries, in just a fraction of the time!
If you don’t have a Transfer Express account yet, you can sign up for free here.