When ordering screen printed transfers, you may have heard us talk about a backing color at some point.
In some scenarios with our screen printed transfers, a backing is needed.
A backing color would only exist when there are multiple ink colors in your design. And just because there are multiple colors, doesn’t mean that your design needs a backing color.
However, multi-color orders for certain transfer types must have a backing color.
Confused yet?
Don’t worry.
What is an Ink Backing Color?
Let’s back up a moment. No pun intended 😉
A backing color is a common ink color that surrounds all of the other ink colors in the design.
It will be a common outline color. The backing color can also have stand-alone ink areas that are not surrounding another ink color, as long as it is the same color as the outlines.
So in other words, the outermost ink color in any part of the design all has to be the same color.
Let’s think about the screen printing process. Each color of your design is printed one at a time from its’ own screen.
Think about it as layers being added onto your transfer sheet to complete the final design.
After the first color is printed onto the sheet, the next color is printed on the same sheet as the previous color, over top of any potentially touching areas.
During the print process, the backing color is the last ink color printed, which goes on top and covers all the other colors on the sheet.
Don’t forget that the printing process happens in reverse order. So the last color printed that covers the other inks is actually the color that will be “on the bottom” of all the other ink colors in your finished heat pressed design.
The color that was printed first, is actually the color you see “in the front” or on top of your finished design.
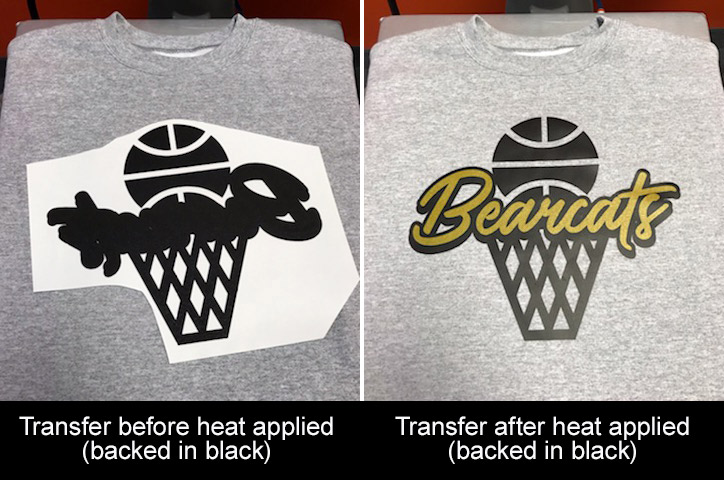
Therefore, when there is a backing color, there will be an outline of this color around the entire outside areas of all of the other artwork in your design.
Let’s look at some examples to help clear things up.
In this wrestling design, QWR-74, there is a white outline around the navy blue text and eagle, and the rest of the design is all white. White is the backing color. White surrounds every other color in the design, which in this case, is the navy blue ink.

Let’s switch this design for a moment. We changed the white ink inside the eagle to show-through, so the grey fabric of the shirt is showing through.

The design above is no longer backed in white. The navy blue ink in the eagle is now an “outer” color that is not outlined in white. The navy blue is not completely surrounded in white and the edge of the navy blue is “touching” the fabric without the white.
The inside of the eagle doesn’t have to be white. It could be gold, for example. As long as any “outer” edge is white, for this design, then it can be backed in white.

Make sense?
How about this design?
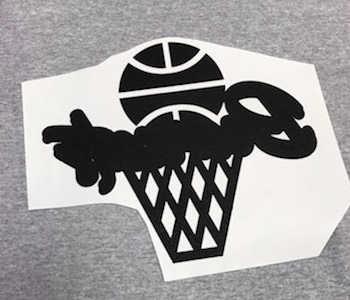
It has a red backing color. All of the black areas are surrounded in red. There are also some stand-alone red ink areas, which is fine.

When Do You Need a Backing Color?
So now that you know what a backing color is, when do you need one?
Certain transfer types need a backing, while others do not.
Elasti Prints® Screen Printed Transfers
All Elasti Prints transfers need a backing color.
For Elasti Prints, if your design doesn’t naturally have a common outline color, there is an option to back your design in “clear”.
This is a great option if you don’t want to change your artwork at all. If you choose “clear” as your backing, your artwork will stay the same, meaning you won’t have to add any outlines that weren’t already there.
However, “clear” is a clear ink and will add an additional “color” to your transfer, which will also increase the cost of the transfers by another color.
Goof Proof® Screen Printed Transfers
Goof Proof transfers don’t need a backing color. For Goof Proof, there is an option for Goof Proof No Backing.
If your design doesn’t have a backing color, it will be printed a little differently using the process we use for Goof Proof No Backing.
When you receive Goof Proof transfers with no backing color, your application instructions will reflect it saying Goof Proof No Backing. Goof Proof No Backing transfers have a slightly longer application time than Goof Proof that does have a backing.
Instead of the 3-5 seconds for Goof Proof, apply Goof Proof No Backing for 7-9 seconds. The rest of the Goof Proof application instructions stay the same. Always follow the instructions that come with your transfers.
Polytrans Screen Printed Transfers
Polytrans transfers are actually the same inks as Goof Proof, and are applied with alternative instructions (10 seconds at 340°F).
However, Goof Proof No Backing cannot be applied as a Polytrans transfer type.
Only Goof Proof transfers that have a backing (or are single color) can be applied as Polytrans.
So in other words, Polytrans screen printed transfers must have a backing.
All Other Screen Printed Transfer Types
All of our other screen printed transfer types (Hot Split, Glitter, Pearl Prints™, Puff, and Glow-in-the-Dark) do not need a backing color.
How to Add a Backing Color to Your Design in Easy View®
If you need a backing color for your screen printed transfer design, it’s easy to add in Easy View, the online designer.
Once you choose a layout, click on the various pieces to make sure that they all have a common outline color or are the same color as your outline color.
When it comes to artwork outlines in Easy View, you will see 3 different possibilities by default:
- some pieces of art have an outline built into it
- some have an outline but it is set to show-through so you may not see it
- other pieces don’t have an outline, but you can add an outline to it
For this example, we are starting with layout QAS-166.
We are going to use an Elasti Prints transfer type, so we need to make sure it is all backed. The team colors are black and red, so we will be backing everything in red.
After we click on the text “ALL STARS”, we can see that there is a show-through outline in the color swatches on the left-hand side.

In this case, all we need to do is click on the “show-through” color swatch and choose red for the outline color.
We changed the star to be red as well.
Next, we’ll click on the text for “COMPTONVILLE”. When we look at the color swatches on the left side, there is no “show-through” swatch.
In this case, we’ll just need to add the outline and choose red as the color.
To add the outline, click on the “Show Special Effects” option in the lower left corner.
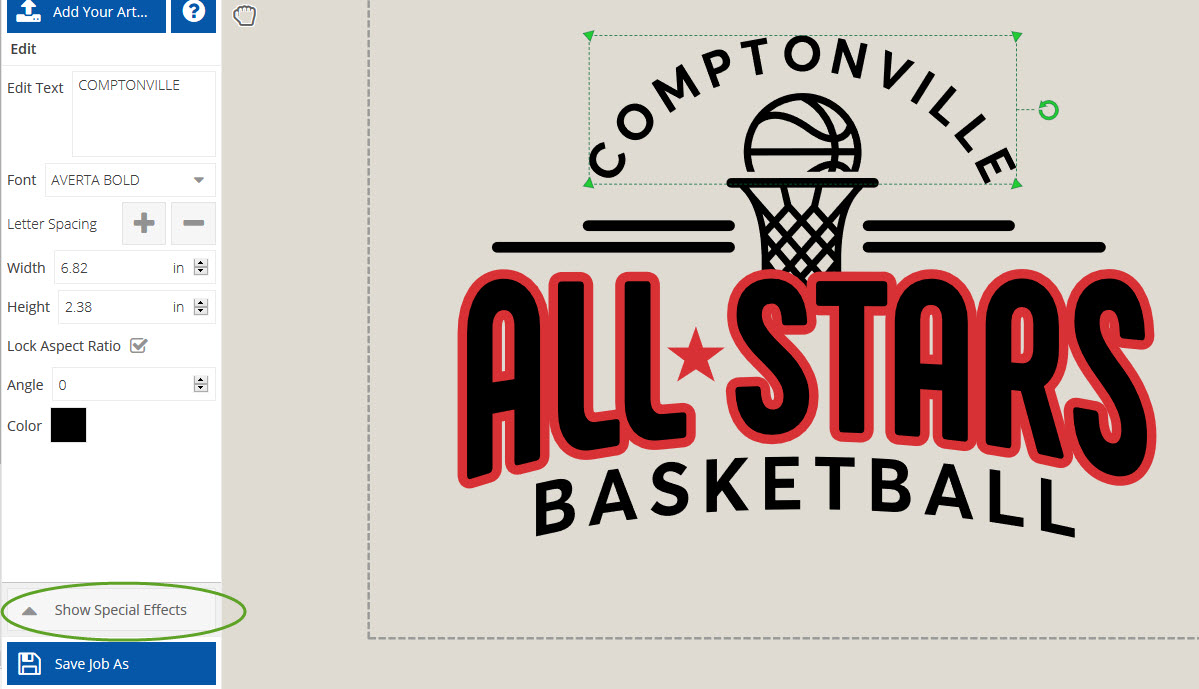
Next, click on the “Effects” option.

Scroll down until you see “Touching Outline” and click on that.

Then, a new panel with the outline settings will appear on the right hand side.
You can adjust the outline width and color from this panel.

For this example, click on the Color swatch to choose red.
For the word “BASKETBALL”, we did the same but needed to adjust the outline so that it would match more closely to the “ALL STARS” outline. To do this, just click on the “ – “ button to make it smaller.

To finish off the design, we changed the basketball/hoop and lines to red also.
This design can now have a red backing, because all of the black areas have a red outline, and all of the other areas are already red.
A Quiz on Backing Colors
Let’s test what you’ve learned on backing colors with this quiz.
Which design below has a backing color?

Let’s see how you did. Some of these were a little tricky!
The correct answer is #4.
#4 is the only design that is fully outlined in a common color or has single color pieces in that same color (white).
Why the others are not backed:
#1 has a red star. All of the other pieces are black or outlined in black.
#2 has the basketball outlined in white. All of the other pieces are navy blue or outlined in navy blue.
#3 has the eagle outlined in orange. All of the other pieces are white or outlined in white.
Hopefully you now have a better understanding of backing colors for screen printed transfers!
Design your own screen printed transfer in Easy View now.