
Using your Cricut cutter to create shirts is great if you are only doing a couple of shirts and the design is simple.
But what happens if someone asks you to do 20, 50, or 100 shirts? A 2 or 3 color design? Oh, and they want the design to have that vintage, distressed look. What would you do?
Don’t worry, you don’t have to panic.
Your answer is heat applied transfers, either screen printed or digital.
[Related Content: 4 Reasons When You Should Switch from Vinyl (HTV) to Screen Printed Transfers]
What are Screen Printed Transfers?
Screen printed transfers are made using the screen printing process, but onto a special transfer paper instead of directly onto a shirt or other apparel. The end result is just as durable, but to use screen printed transfers, all you need is a heat press instead of all the chemicals, inks, screens, and equipment needed to do the actual screen printing.
[Related Content: Why You Need to Spend More Than $300 on a Heat Press]
It takes a good chunk of time to do the whole screen printing process, but screen printed transfers apply in as little as 4 seconds.
So screen printed transfers are fast and easy. It barely takes any time at all to learn how to apply a screen printed transfer.
Artwork for T-Shirts
You may or may not already have the artwork for your t-shirt design.
In some cases, you already made the t-shirt design for at least one shirt, the customer loved it, and then they came back and wanted 20 more shirts just like it.
The problem is that you created the design in Cricut. How do you use the same design for screen printed transfers?
It’s easy.
This video explains the process:
Here is the step-by-step process of getting your Cricut artwork ready to submit for screen printed transfers.
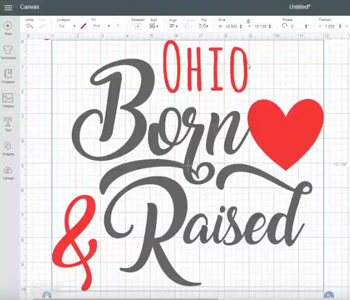
Prepare Your Cricut Artwork
Go into your Cricut Design Studio where your artwork is located that you used to cut your original design.

Start by changing all the pieces in the design with the Linetype set to Cut and the Fill set to Print. Then modify the print colors to whatever colors you want the final transfer to be. This will give the design crisp areas of color without the thin cut line that appears on images prepared for cutting on your Cricut.
Next, size the design to take up as much of the screen as possible. Since there is no way to actually export or save the artwork outside of Cricut, you will eventually be taking a screen shot of the image, so bigger is better to capture all the details.

Finally, turn off the visible grid lines so the image has a solid white background. This will help give the final image nice, clean lines.

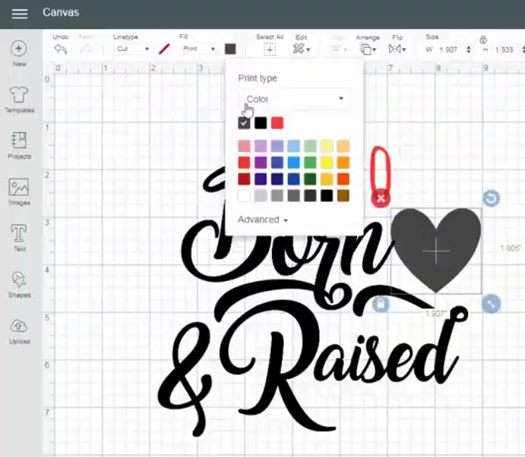
Take a Screen Capture of Your Design
Now, use a screen snipping tool to select the image.
In the video above, we used the default Windows 10 Snipping Tool, but there are lots of tools out there you can find with just a little bit of research if you don’t use Windows.
The key here is to try to get as close to the edges of the design as possible. This will make sizing the image easier later on. And don’t worry if you don’t get it on the first try – this part can be tricky!
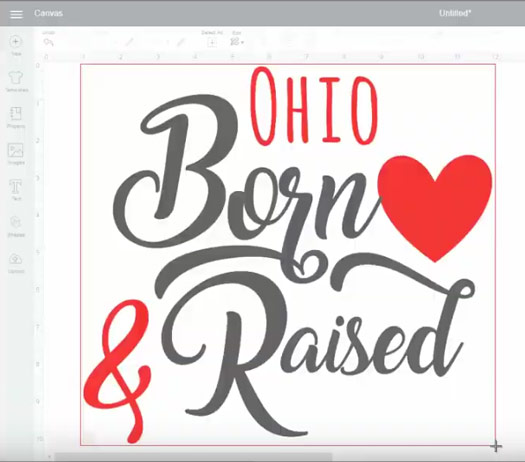
Once you have your image captured the way you want, save the snipped image to your computer as a .png or .jpg file. Either file type will work.
Import the Image File into Easy View
Next, log into Easy View, the online t-shirt transfer designer.
Click the “Add Your Art” button and choose the file from your saved location.
The tighter you got your screen shot closer to the artwork, the easier it will be to size your final transfer design.

Set your design to the size you would like your transfer to be.
Since this is a bitmap file (.png or .jpg), you will need to click the “Configure Color Map button” if you are getting screen printed transfers. This will choose the ink colors for printing.
Once you have clicked the Configure Color Map button to set the transfer ink colors, click on an area of color in the design and the transfer ink color choices will appear. All areas of the same color will be assigned whatever ink color you choose. And the color choices depend on your transfer type, so if you’re not sure or didn’t choose one yet, you can always go back and change it.

Click the back button to return to the Easy View workspace. It helps to change the background color to match the background in your image, which is why we chose white earlier.

If you are choosing to get a digital transfer type instead of a screen printed transfer, you won’t have to configure the ink colors, it will print as is.
And now you are ready to place your custom transfer order with art you created in Cricut!
Start designing in Easy View now or sign up for a free account.