When ordering UltraColor® Max heat transfers in Easy View® online designer, one of the final steps the designer does in the Review stage is run your artwork through a “heat map” analyzer.
The heat map is scanning the artwork to make sure it meets all the printing guidelines for UltraColor Max.
It checks line thickness, show-through thickness, and looks for any soft edges that could be problematic.
The heat map will highlight any areas of concern in a bright pink color.
The pink is there to show you that something is wrong with the area being highlighted. It could be one of the three things mentioned above:
#1 – The edges of the artwork aren’t hard edges, meaning there’s a fade on the edge. Remember that digitally printed transfers can’t have soft edges. Art cannot fade into nothing on the edges.
#2 – The printed lines aren’t thick enough.
#3 – The show through areas aren’t thick enough.
To know exactly what the problems are, you’ll also get warning messages on the left side to see why the areas are being flagged and made pink.
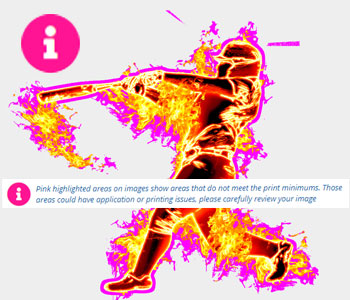
![]()
See the pink areas around the edge? That is the “heat map”.
The pink corresponds with the pink warning you see off to the left hand side of the screen. In this case, the pink highlights are showing that this clip art has soft edges around the entire design.

Another example is if you have really small detail in your image. Those small details are not going to hold – hence the pink on the heat map. If we zoom in, we can see that the heat map is showing us the specific areas that don’t meet the minimum printed line thicknesses.

There’s also a message to the left letting you know that the pink is for line thickness.

So what happens when you get these warnings? What should you do?
Your Options for Heat Map Warnings
When the heat map discovers areas that don’t meet the printing requirements, there are a few options.
- You can go back to your original file and fix the problematic areas in the art and then reupload it.
- You can choose to have one of our artists fix it for you.
- Or in some cases, you may choose to approve it to print “as is”.
Choosing to print “as is” does come with some risk, so this option should be used sparingly, or as a last resort if the heat map is showing pink areas.
Printing “as is” could result in some application or printing issues because not all of the artwork is meeting the guidelines.
You’ll mostly want to choose to fix the issue(s), whether you want to fix it yourself and reupload it or have one of our artists do it for you, if you are unable to fix it yourself.
To fix it yourself, head back over to your design program (such as CorelDraw, Illustrator, Affinity, etc.) to fix the pink highlighted areas. Once you have finished, reupload your newly saved file.
When you get to the heat map step, the analyzer will run your artwork again and you’ll be able to see if the pink areas have been resolved.
Alternatively, if you are choosing for our graphic design department to fix it for you, just click on the option in the lower right hand corner that it “Needs Artist Attention”.
When you click this option, one of our artists will fix it for you.

Anytime you select this option for artist help, your order will switch to be a proof order so you can confirm the changes our artists provide to the artwork.
Easy View will automatically change the order into a digital proof order for you.
Artist Attention
No matter what the reason for the pink is, our artists can help if you choose this option.
Fixing the line thickness and show through thickness situations are pretty standard. It’s the same type of situation when artwork on screen printed transfers isn’t thick enough.
Our artists can thicken lines up to minimums and open up show through areas as well.
However, in the case of fixing soft edges, that can be a little more tricky. That has the potential to change the look of the whole design.
Our artists can fix it, no problem. But instead of having an edge that fades, it’ll be a hard edge that just stops.
In fact, if your image has large amounts of soft edges, Easy View will actually force you to fix the issue, whether you fix it yourself or choose for our designers to fix it for you.
With lots of soft edges, you cannot choose to print “as is”.

When this happens, your only option in the lower right corner will be “Needs Artist Attention”.
You can, of course, fix it yourself and re-upload a new version to avoid the digital art proof, if you would rather go that route.
Placing Your Order after the Heat Map
After you have fixed your artwork, or decided you want our designers to fix it for you, or are approving it to print “as is”, you’re ready to place your UltraColor Max order.
To place your order, you’ll need to check one of the boxes to the left of the green buttons. The two options are:
- Can be printed “as is” or
- Needs Artist Attention

As mentioned before, when you choose option 2, Needs Artist Attention, the order will be turned into a digital art proof order for you to approve before we actually start printing your transfers.
After you have clicked either box, the green button will be available.

Once you click the green button, your order will be added to your cart where you can then complete your order.
[Related Content: Direct to Film Heat Transfers UltraColor Max]