When ordering screen printed transfers or full color transfers, your artwork needs to meet certain line thickness and show-through area minimum requirements. The easiest way to check if your artwork meets these minimums is using the Line Thickness Tool in Easy View.
This tool gives you the control and confidence to know if your artwork will print and apply properly.
What are Line Thickness and Show-Through Areas?
In general, your design will consist of printed and non-printed areas.
There are certain guidelines to follow so your artwork will look good and be durable after it is applied to the apparel.
Let’s take a look at each of the areas to see what they are and why they are important during the printing process.
What is Line Thickness
Line thickness refers to the printed areas of your design, regardless of the actual shape, not strictly just “lines”. For example, line thickness could be for circles, too.
It is how wide a printed area consists of.

This is important because printed areas with too thin of lines may not adhere to apparel when heat pressed. If there isn’t enough ink or adhesive available, it won’t be able to get a good grip to the apparel.
Or it may apply, but it may not be very durable and will wash off within a few washes.
Too small of printed areas may not even make it to the heat application stage itself. Small dots of ink could fall off of the transfer paper with any jostling during shipping, for example.
What is Show-Through
On the other hand, show-through areas are the non-printing areas of your design. It is the space between the ink, where the apparel color will be showing through the design and is visible.

For non-printed areas where there is no ink, there needs to be enough of an open area where the ink will not “close up” when pressed.
During heat pressing, the inks are “smashed” onto the apparel. Inks will spread out slightly as the inks warm up and get squished outward. While this spreading is small, the inks do expand some, causing open areas to get smaller.
Minimum Artwork Requirements
The minimum specifications for line thickness and show-through areas depend on the transfer type.
When creating your designs, make sure to follow the artwork guidelines for the transfer type you are ordering.
Goof Proof, Elasti Prints, Hot Split Retro, Glow-in-the-Dark:
- Line thickness: minimum of .012″ for printed areas.
- Show-through: minimum of .04” for non-printing areas
Puff:
- Line thickness: minimum of .012″ for printed areas (this may need to be increased for non-puff colors printed next to a puff color. Be aware that Puff will increase the printed line thickness. A line that is .023″ will puff up to become .05″ in the applied transfer.
- Show-through: minimum of .1” for non-printing areas
Reflective:
- Line thickness: minimum of .025″ for printed areas.
- Show-through: minimum of .04” for non-printing areas
UltraColor Max:
- Line thickness: minimum of .018″ for printed areas.
- Show-through: no limit for non-printing areas
UltraColor Pro and UltraColor Soft:
- Line thickness: minimum of .014″ for printed areas.
- Show-through: no limit for non-printing areas
UltraColor Stretch:
- Line thickness: minimum of .038″ for printed areas.
- Show-through: no limit for non-printing areas
UltraColor Stretch with Blocker:
- Line thickness: minimum of .062″ for printed areas.
- Show-through: no limit for non-printing areas
For full artwork guidelines, make sure to follow the guidelines for each transfer type found on the product pages for screen printed transfers and full color transfers.
[Related Content: Artwork Guidelines for Your Custom Transfer Designs]
Using the Print Standard Tool (Line Thickness Tool) in Easy View Online Designer
So now that you know what line thickness and show-through areas are and why the minimums are important, we’ll now show you how you can mitigate any issues related to these.
When you are designing in Easy View, there is a tool you can use to make sure all areas in your artwork are following the artwork specifications.
You can use this tool whether you have designed from our Easy Prints layouts and clipart or you have uploaded your own artwork into the designer.
To check your artwork, click on the Print Standard Tool in the upper right corner of the artboard.

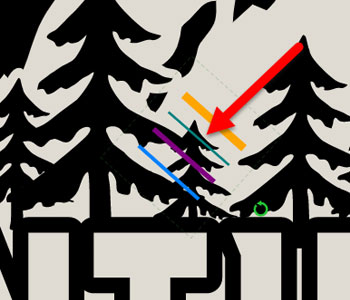
It will bring up a tool in the middle of the artboard with 4 colored lines.

You can drag these lines around to check areas of your artwork. You can even use the green rotate handle beside the tool to rotate the lines to fit different angles of your design.
Make sure you use the correct colored line for what you are checking.

In this example, we are making a design for a Goof Proof transfer.
So the yellow and green lines will be our guides for this design since the minimums for Goof Proof are .04” for show-through and .012” for line thickness.
First, let’s use the yellow line to check the show-through area for this non-printing outline around the trees.
To help see the design better, you can zoom in closer for these smaller detail areas. There are a couple ways you can zoom in, one being the “+” button on the right side of the art board.
Click the “+” button until you are satisfied with the zoom.

Now, by rotating the tool, we can move the yellow line right into the space we want to check. Since the yellow line fits in the space and is smaller than the show-through area, our show-through area meets the minimum requirement in this spot.

Next, let’s check some of our line thicknesses, so we’ll use the green line.
The smallest printed areas in this design are in the mountain range, some of the tree areas, and the printed outline in the letters. So we’ll check each of these areas with the green line.


All three of these areas are wider than the green line, so all of them meet the minimum line thickness requirement for this example.
When you are done checking your line thickness and show-through areas, you can click on the Selection Tool and the Print Standard Tool will go away and your regular Selection arrow will return, where you can click on your design again.

How to Fix Artwork When it Doesn’t Meet Requirements
There are a few things you can try if your artwork doesn’t meet the minimum artwork guidelines.
Try adding an outline to thicken areas up. This will help both printed and non-printed areas.
For printed areas, you can make the outline color the same color as the area you are printing.
For show-through areas, just set the outline ink color to “no ink”, which will widen the show through area.
Another thing you can try when trying to meet minimum art guidelines is to scale your artwork larger. In turn, this will also make the lines larger and show-through areas larger as well.
If after trying these and you still aren’t meeting the minimum requirements, you can always add notes to your order to let our designers know to thicken any areas for printing or show-through to meet the requirements.
Simply click the “Add Notes” at the bottom of the artboard to type in anything you would like noted about your order.

Watch Dave show how to use the tool to see it in action in this video.