It takes a lot of practice before we become good at anything we try and heat printing is no different! It’s possible to learn how to operate a heat press in one lesson, but that just scratches the surface to learning all the tricks of the trade. Below are some common problems associated with heat printing apparel and some tips to take corrective action.
If you notice bubbles or pockmarks on the surface of a transferred design, this is a sign that moisture is in the apparel and was trapped under the surface of the transfer during the heat pressing cycle. The solution to this problem is easy; simply pre-press the apparel for four seconds prior to applying the transfer to remove this excess moisture. And to help assist you with pre-pressing, the Stahls’ Hotronix® heat press is equipped with a digital timer that allows for setting two subsequent pressing cycles: a pre-press cycle followed by the transfer application cycle. Not all heat presses have this feature!
After heat pressing and peeling a transfer, you see the ink is not releasing from the paper in the middle of the design. This problem is generally due to lack of clamping pressure and increasing the machine pressure is recommended.
Setting the pressure on economy presses and older heat presses can be more difficult because these machines don’t have pressure read out gauges. To help make this step easy, the Stahls’ Hotronix® has a digital pressure readout featuring numbers from one to ten.

These numbers indicate how much downward pressure is being exerted. Example: a pressure setting of 3 or 4 indicates light pressure, 5 to 6 is medium pressure, and a setting of 7, 8 and above indicates heavy pressure. This numbering system is perfect for training new employees and the old pros love it, too!
Application tip: Pre-heat the lower rubber pad prior to starting a production run. After a heat press sits idle the lower platen cools off to room temperature, so it’s recommended to lock down the heat element (without a garment on the machine) for a full cycle to pre-heat the lower rubber pad. Try it and your production run will go much smoother!
Controlling apparel dye migration when applying light colored transfers to dark apparel can be an issue until you learn how to solve this problem. 100% polyester fabric is the main culprit and we recommend using our Elasti Prints® heat transfers that are applied at 300 degrees F. (Lower application temperatures greatly reduce dye migration problems.)

Following our transfer application instructions and setting the heat press to the correct time, temperature, and pressure is critical and once again the Stahls’ Hotronix® heat press makes this task easy with its standard digital controller for setting the time and temperature and with it’s accurate over center pressure adjustment with digital pressure read out.
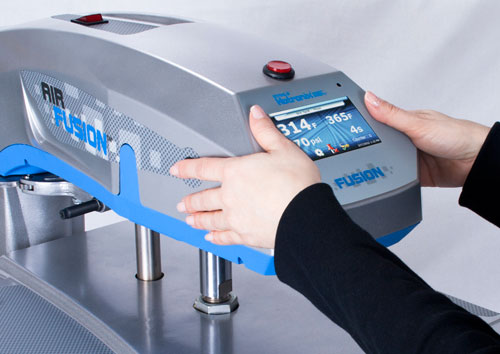
For high volume shops, the Stahls’ Hotronix® Air FUSION® features a programmable touch screen that allows for multiple pre-sets for time, temperature, and pressure for different transfer types. This programmable feature helps speed up production set up times and avoids costly application errors.

When combining the “practice makes perfect” rule along with Transfer Express heat transfers and Hotronix® heat presses, you are on the path to success for your business!
I have lost my directions for setting up the press. Do you have a link to printed directions?
Melinda, which model do you have? You can answer here or email it to info at transferexpress.com