We make roster and class list custom screen printed transfer orders very easy to accomplish. The first, and easiest way, will always be to do a web order. By choosing the layout online and typing the names right into it, you prevent a typesetting fee AND the get to see an example of it right there on spot. Plus you can be sure that the names are correct because you typed them in. These layouts are called “Web Typesetting Layouts” on TransferExpress.com
The second way we make class lists and rosters easy is by offering the ability to upload a .TXT file. Sometimes a larger list of names is needed. These lists are more than our “Web Typesetting Layouts” can accommodate. That’s where “QTY Typesetting Layouts” come into play. You still select a layout (from the QTY Layouts section) but then instead of typing the names into the layout, simply type the names into a .TXT file and upload that to us. This way they still avoid the typesetting fee and any longer schedule.
The question is: “How do I make a .TXT file?”
This is a VERY simple task on a computer with Windows Operating System. Let’s go step by step.
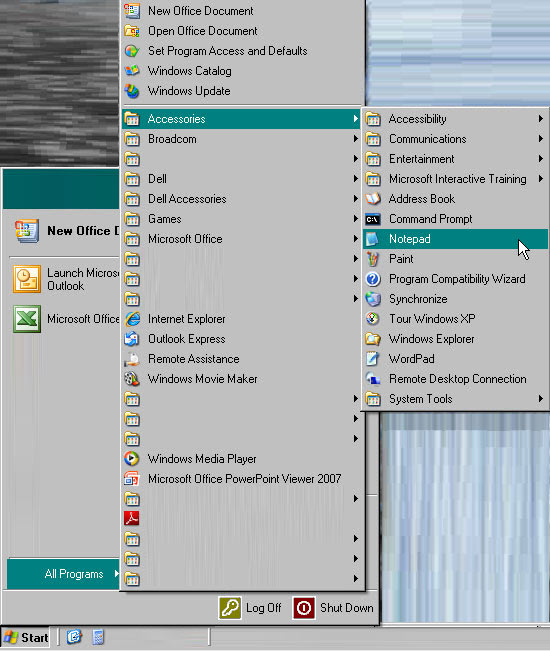
#1 – Find Notepad
Every Windows computer has Notepad – an incredibly basic word processing software. You simply click your “Start” button, move your mouse over to “All Programs” and wait for the next menu to pop up. Move your mouse arrow over to “Accessories” and wait for the next menus to pop up. Under this “Accessories” menus you’ll find an icon that looks like a small flip pad and the title says “Notepad.” Or you can just search for notepad if you have a search box at the ready (Windows 7).

- Browse to find Notepad on your windows computer
#2 – Type your names
Click on the Notepad icon to get a blank Notepad screen. You need to type the names EXACTLY as they want them to appear on the order, and in the specific order they need to be (ie: alphabetic, by grade, by team, etc…). The names need to be in ONE single column with no extra formatting marks.

#3 – Save your file
Saving a file is very simple. Up above on the menu bar you’ll see the word “File” – click there. On the menu that pops up click the “Save As” option. Below is a picture of the menus that pops up next. This screen allows you to choose where to save the file to and what you want to name it. At the very top of this new window you see “Save in:” – this is where your file will save to on your computer. Desktop is the best place because the file will be easy to find and easy to delete when you’re done with it. Then at the very bottom of this window you see “File name:” and “Save as type:” In the “File name” area you simply want to type whatever you want to name the file (remember not to delete the .txt extension). Under “Save as type” you need to make sure Text Document (.txt) is selected. Then click save!
Depending on the version of Windows, things may look different or be worded just a little different then some of the notes above. But these are the rough instructions to guide you through to save a .TXT file.
What’s Next?
The next step is to upload the file on TransferExpress.com. Look for the Send Us Your Artwork button on the home page. Once we receive the file will call you to review your file/order.